When checking out, simply select the "New Customer" option. All you need to get started is a valid email address and a secure password of your choosing. After your purchase is complete, your account will be created, and you will immediately gain all the benefits of being an account holder. If you have previously placed an order with us as a guest, you can try using the "Forgot Password" feature under the "Sign In" tab.
Benefits of having an account:
Real-time status updates on all your orders and returns.
Ability to view detailed order history.
Eligibility to enroll in subscription items for recurring discounts.
Access to more store features and quicker customer support.
Connection to a dedicated sales representative if placing bulk orders.
Manage your account settings:
Update your email address and password.
Unsubscribe from email promotions.
Manage item subscriptions.
Delete your account and remove your information.
We respect your privacy and are committed to protecting any personal information you may provide us through our Website. View our privacy policy for more info.
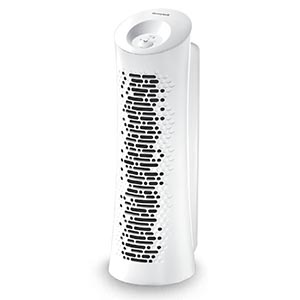
Setting up your Honeywell Air Purifier correctly before its first use is one of the most important steps to ensure
years of reliable performance. Whether you've purchased a Honeywell HPA Series, InSight Series, or another
compatible model, taking a few minutes to properly prepare the unit will help maximize airflow, improve filtration
efficiency, and prevent unnecessary wear on the motor.
This guide walks you through how to set up a Honeywell Air Purifier, from taking it
out of the box to installing the filters correctly and selecting the ideal cleaning mode for your
home.
Step 1: Unbox Your Honeywell Air Purifier
Unboxing Checklist
Carefully remove the air purifier from the shipping box.
Remove all exterior tape, foam inserts, cardboard supports, and protective packaging.
Locate the user manual and replacement filter information included inside the box.
Inspect the purifier for any visible shipping damage before plugging it in.
Although your Honeywell Air Purifier may appear ready to operate immediately, the internal filters are typically wrapped in clear plastic to protect them during shipping. These protective bags must be removed before using the purifier.
Step 2: Choose the Best Location
One of the easiest ways to improve air purifier performance is proper placement. The purifier needs unrestricted
airflow to continuously pull in dirty air and circulate clean, filtered air back into the room.
Proper Air Purifier Placement
Place the unit on a stable, flat surface.
Keep the purifier at least 3 feet away from walls, furniture, curtains, bedding, or other obstructions.
Do not place it inside cabinets or behind furniture.
Avoid locations where intake or exhaust vents could become blocked.
Keep doors or large furniture from restricting the purifier's 360-degree airflow.
For bedrooms, position the purifier several feet away from the bed rather than directly against it.
Proper placement helps your Honeywell air purifier clean the entire room more efficiently while reducing
unnecessary strain on the fan motor.
Step 3: Open the Front Grille and Remove the Plastic
How to Open the Honeywell Air Purifier Front Grille
Before operating the purifier, you'll need to access the internal filter compartment.
Critical First-Time Setup Warning
Do NOT plug in or operate the air purifier until all protective plastic has been removed from every
filter.
To protect against dust during shipping, Honeywell HEPA and charcoal pre-filters are sealed in plastic bags. These plastic bags are not part of the filter and must be completely removed.
Running the purifier with plastic still covering the filters severely restricts airflow. This can cause:
Poor or almost no airflow
Loud humming or straining sounds
Motor overheating
Reduced filter performance
Possible permanent damage to the fan motor
If your new Honeywell Air Purifier seems unusually loud or blows very little air during first use,
immediately turn it off and verify that all filter packaging has been removed.
Remove the Filters
Open the front grille according to your model's instructions. Most Honeywell HPA and InSight Air
Cleaners allow the front cover to pull forward or release using side tabs.
Remove each filter and completely discard the clear plastic wrap before reinstalling.
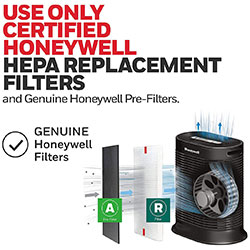
Type R HEPA Filters
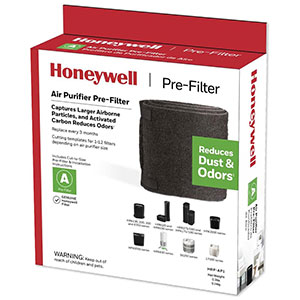
Type A Charcoal Pre-Filter
Step 4: Reinstall the Filters Correctly
After removing the protective plastic, reinstall the filters in the correct order.
Correct Filter Installation Order
Install Type R HEPA filters securely into their designated slots inside the filter compartment.
Place the Type A charcoal pre-filter over the front of the HEPA filters so it faces the front intake grille.
Secure the front grille back into place before powering on the unit.
The HEPA filters perform the primary particle filtration, while the charcoal pre-filter captures larger
particles and helps reduce household odors before air reaches the HEPA media.
Step 5: Power On Your Air Purifier
First Startup
After confirming the filters are installed correctly and the front grille is fully closed:
Inspect the power cord for damage.
Plug the purifier directly into a standard grounded wall outlet.
Press the power button.
Select your preferred cleaning level.
Understanding Honeywell Cleaning Levels
Many Honeywell Air Purifiers include several fan speeds or cleaning levels designed for different air quality conditions.
Germ: Everyday cleaning with quieter operation.
General Clean: Balanced airflow for routine household use.
Allergen: Increased airflow for pollen, dust, and pet dander.
Turbo: Maximum airflow for smoke, cooking odors, or rapidly cleaning indoor air.
For the first few hours of operation, many homeowners prefer using the Turbo setting to quickly circulate and clean
the room before switching to a quieter daily setting.
Your Honeywell Air Purifier Is Ready to Use
Once unwrapped, properly installed, and placed in an open area with good airflow, your Honeywell air purifier is ready to use. To maintain peak performance, clean the exterior air intake occasionally and replace your HEPA and pre-filters on schedule.
Frequently Asked Questions
Why is my new air purifier blowing weak air or making a loud humming sound?
The most common cause is plastic packaging left on the filters. Turn off and unplug the unit, remove the front grille, and ensure all clear plastic wrapping has been taken off both the HEPA filters and charcoal pre-filter before restarting.
Why does my new air purifier smell like plastic?
A mild "new appliance" odor is normal during the first 24 to 48 hours of operation and quickly dissipates. If you notice a strong burning or hot plastic smell, immediately turn off and unplug the unit to verify that no plastic wrapping remains on the internal filters.
Which direction should Honeywell HEPA and pre-filters face?
R HEPA filters should be installed inside the filter compartment first with their pull tabs facing outward. The A pre-filter must sit directly over the front of the HEPA filters, facing the front intake grille to trap large dust and odors first.
Should I leave my Honeywell Air Purifier running 24/7 after setup?
Yes. Air purifiers are designed for continuous 24/7 operation to capture airborne particles and allergens as they enter the room. After running the unit on Turbo for the first 1 to 2 hours, switch to General Clean or Quiet/Germ mode for round-the-clock air cleaning.
Should windows and doors stay closed when running an air purifier?
Keep exterior windows and doors closed while the air purifier is running. Leaving windows open continuously introduces outside pollutants like pollen, dust, and smoke, preventing the purifier from effectively filtering the room's air volume.
Explore Honeywell air purifier guides to troubleshoot common questions, find compatible replacement filters, and create a cleaner and more comfortable indoor environment.
Contact options may differ depending on the type of help you need.
Cookie Preferences
This site uses a small number of cookies to provide a secure and reliable shopping experience.
Required cookies are set directly by this site and are used only for essential store functions such as maintaining your shopping cart, processing checkout, providing security, and keeping the site working properly. We also use optional Google cookies for website analytics and advertising measurement. You can choose whether to allow these Google cookies below.
Required Cookies
These cookies are necessary for essential website functions, including your shopping cart, checkout, site security, and maintaining your shopping session. These cookies are set directly by this site and cannot be disabled.
Always Active
Google Analytics & Advertising Cookies
We use Google services to understand how customers use this site, improve site performance and navigation, and measure the effectiveness of our advertising. These cookies are optional. Turning them off will not affect your ability to browse, shop, or complete an order.
Learn more about how we protect your information in our Privacy Policy.